How to Tie a Tie: 3 Knots for Every Occasion. Having trouble tying a tie? Use our simple step-by-step instructions to tie various knots, including the Windsor and double Windsor.
Certain outfits appear better with a tie, whether they are worn for work or social events. A straight tie, worn behind the shirt collar and knotted at the throat, adds class and refinement to a suit, vest, or shirt and slacks. Straight ties done by hand are more appealing than clip-on, which may seem to be the simplest solution. Numerous fresh appearances and styles are available when you know how to do it. There are options for every neck size and shirt style among the three tie knots.
We advise beginning with the full Windsor if you want a simple knot. Men and women can flaunt a dapper tie in just a few minutes thanks to our how-to videos and clear directions. For optimal performance, people should practice tying knots in front of a mirror.
The Full Windsor Knot: Instructions
The Windsor knot, which has a polished triangular design, is a fantastic choice for social occasions, presentations, and job interviews. This knot looks great with a spread-collar shirt due to its wide appearance. The full Windsor knot can be tied without much trouble, despite the fact that it could seem complex.
Raise the collar of the shirt and drape it around the neck so that the broad end is on the right side and extends about 12 inches below the small end before starting the full Windsor knot.

- Cross the tie’s wide portion over the narrow portion.
- Pull the wide end up and down through the neck opening.
- With the wrong side facing out, pass the wide end underneath and to the right of the narrow portion.
- With the right side facing out, cross the wide part over and to the left of the narrow part.
- Pull the broad end through the neck opening.
- Pass it through the loop at the front as you lower it.
- With one hand holding the protruding portions, gradually push the knot up toward the collar with the other until it is snug.
The Half Windsor Knot: How to Do It
You can have a wide range of options when getting ready if you know it. The possibilities can only be expanded by variations. The triangular, symmetrical design of the half-Windsor knot makes for an elegant appearance. It goes well with any dress shirt and works best with wider, medium-weight ties because it is smaller than the full Windsor. The half Windsor knot is simple to make and only requires a few basic instructions.
Raise the shirt collar to start the process, just like with the full Windsor knot. Place the tie around your neck with the wide end on the right and the narrow end about 12 inches below it.

- Cross the broad section over the narrow section.
- Cross the wide portion behind the small portion so that the incorrect side is exposed.
- Bring the broad end across to the left and up.
- It should lay the wrong side out to the right after being pulled through the neck opening.
- With the correct side facing up, cross the wide end across the narrow half from right to left.
- Once more pass the wide end through the neck loop.
- Put it through the loop at the front of the collar to draw it down.
- With one hand holding the tails and the other adjusting the knot, slide it upward.
- To finish the appearance, lower the shirt collar.
A Four-in-Hand Knot Explained
When wearing wide neckties made of thick fabrics, the four-in-hand knot works effectively. If you want to spice up a classic look, learn how to tie a tie in this manner. When paired with a typical button-down dress shirt, it looks its best. People may tie the four-in-hand knot quickly and easily by following a few simple steps.
Raising the collar of the shirt, wrap the tie around the neck with the broad end on the right and about 12 inches below the narrow end to complete the knot.
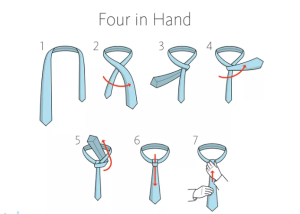
- Cross the narrow part of the tie with the wide part.
- Then, tuck the broad portion under the narrow portion.
- Reverse the wide side so that it is atop the narrow part.
- Bring the broad side up through the wide neck loop.
- Place the broad end through the loop in front while maintaining a loose grip on the knot.
- Slide the knot up until it is tidy and secure while holding the bottom, thin portion of the tie with one hand. To finish the appearance, lower the shirt collar.
Necktie Accessories
Interested in learning more advanced tie-tying techniques? Tie accessories can be used by men or women who use ties to improve both function and style. To hold ties in position and add a dash of style, people can select from a variety of tie accessory styles. These choices are excellent for anyone looking to develop a signature style or improve their everyday wardrobe.
Tie bar: Slides over the tie’s midsection to hold it in position.
Tie clip: Clips into place to fasten to the same location.
Tie Tack: A pin, base, and chain are included in a tie tack to help prevent the knot from slipping.
Tie chain: Consists of a bar and chain arrangement.
Tie strap: Connects to shirt buttons by slipping through the label on the tie’s back.
Check Out: How to Earn $10000 Every Month from YouTube Channel?
Neckties complement both men’s and women’s wardrobes by giving a professional appearance for the workplace or social situations. Every season and occasion has a wide selection of patterns, hues, and fabrics for straight ties, and there are numerous tie knot variations to keep them looking great.